
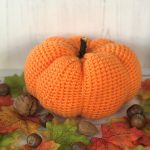
Feeling very autumny, I spent a few happy hours last week on a Pinterest safari looking for crochet patterns for autumnal bits and bobs. I found loads of fabulous leaf patterns, acorn patterns, squirrel and hedgehog patterns and of course pumpkin patterns. A crocheted pumpkin seemed a good place to start as the patterns were all pretty similar and straight forward and I knew I had some orange wool in my extensive stash. So I got a cuppa, my wool and my hook and settled down to start only to realise that the pattern I had chosen was for chunky wool and mine was DK. Not to be beaten I decided to wing it and try to come up with something that would pass as a pumpkin. I was really happy with how it turned out and thought I would share the pattern in case it is useful for you. First, here is what it looks like.

You will need:
Double knitting wool
4mm hook
Toy stuffing
Twig about 1cm thick and about 3-4cm long
Hot glue gun
Wool needle


- Make a slip knot and place it over your hook.
- Chain 68.
- Slip stitch into the starting chain to form a circle.
- Chain 2. (This becomes your first DC)
- Work a DC into the same stitch as your slip stitch.
- Work a DC into each stitch around your circle to the end.
- Slip stitch into the 2nd chain of the chain 2 at the start of the previous round.
- *Chain 2.
- Work a DC into the same stitch as your slip stitch.
- Work a DC into each stitch around your circle to the end.
- Slip stitch into the 2nd chain of the chain 2 at the start of the previous round*.
- Repeat from * to * until your crochet measures as long as you want it to be.
The longer the crochet is the taller your pumpkin will be. I kept going until mine measured around 30cm. - Finish on a slip stitch and fasten off your wool.
You will now have a crocheted tube. - Using the same colour wool and a wool needle, do a running stitch around the edge at the bottom end of the tube. Gently pull the wool to gather the edge until it is as tight as it will comfortably go. Fasten off your wool.
- Using toy stuffing, stuff your pumpkin right to the top so that it is full and plump.
- Using the same colour wool and a wool needle, do a running stitch around the edge at the top end of the tube. Gently pull the wool to gather the edge until it is as tight as it will comfortably go. Fasten off your wool.
- Take a long strand of wool and beginning in the centre of the bottom of your pumpkin, join your wool to the centre and then take it up the outside of the pumpkin and down through the hole in the centre at the top, and out through the bottom.
- Pull this strand of wool and you will see it pulling the pumpkin and forming a segment.
- Repeat this step, taking the wool up the outside, down through the centre and then pulling to form a segment.
- Work your way around the pumpkin until you have as many segments as you want. I mad seven segments on mine.
- Fasten off the wool securely at the bottom.
- Using a hot glue gun, put some glue on your twig and place it into the hole at the top of your pumpkin.
- And viola, you have a lovely autumn pumpkin
If you use this pattern we would love to see a picture of your pumpkins.
Happy Autumn 🙂
I really, really want to make a pumpkin, they look so cute, but then I’ve no idea what I would do with it!
Put it on a shelf, add some flowers and an autumn colour candle and you have cute Autumn display ?